ASUS Z97-DELUXE (NFC & WLC) Review: With Two Thunderbolt 2 Too
by Ian Cutress on May 16, 2014 11:00 AM EST- Posted in
- Motherboards
- Intel
- Asus
- NFC
- 802.11ac
- Thunderbolt 2
- Z97
- Wireless Charging
ASUS Z97-DELUXE BIOS
Since I started writing for AnandTech, back with an initial X58 review and from P67 onwards, the graphical BIOS paradigm has been shifting. Motherboard manufacturers are becoming more efficient in packaging their BIOS into a small 64 Mbit or 128 Mbit package, including enough drivers and extra features (sounds, images) to make the graphical experience for the user better. This should include efficiency tweaks, so we are scrolling at something above 30 Hz, but also some manufacturers have been playing around with higher resolutions, as well as fonts that are easier on the eye than Courier. ASUS falls into this crowd, and its new BIOS expands the fan controls into an easier user experience. However I feel there has been a slight regression in the tabbing interface.
The BIOS receives the same brushed look as the motherboard heatsinks, and while it cannot be metallic, there is a distinct contrast between the color of the background and the text such that users can identify what is written as well as what is selected.
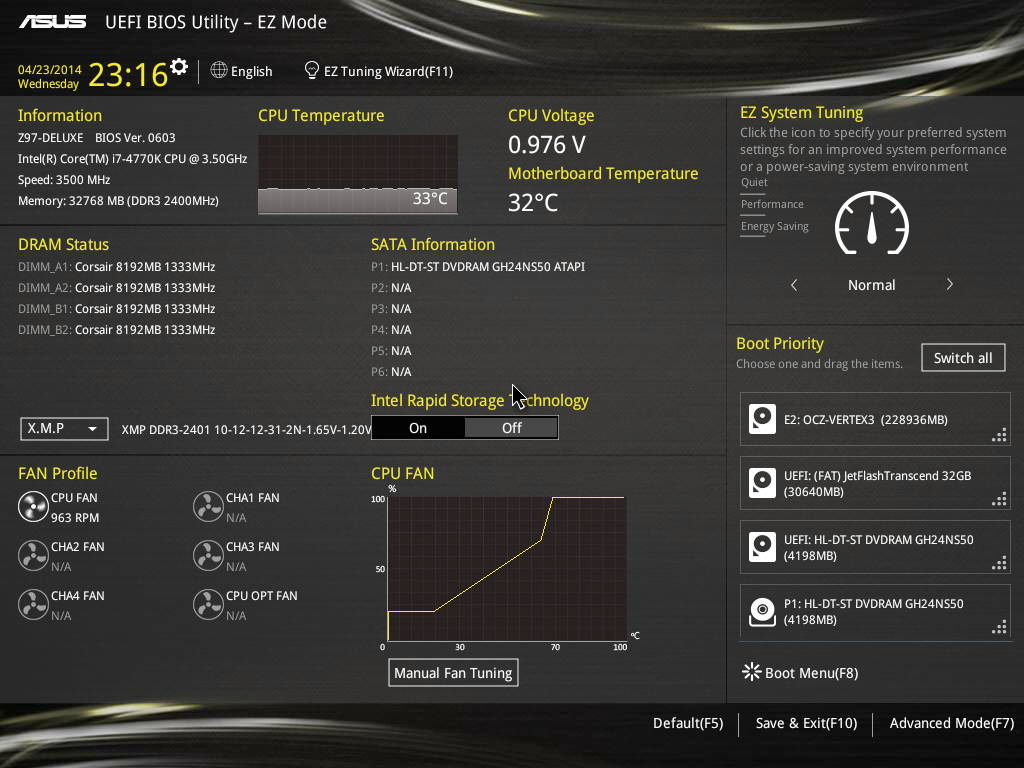
The first screen is the ‘EZ Mode’ which gives info on the system: the motherboard, the BIOS, the CPU used, the PCU speed, the memory DIMMs installed, the capacity of the memory, the speed of the memory, the CPU temperature, the CPU voltage, the motherboard temperature, the fan speeds and the CPU fan gradient graph. Users can enable XMP from this menu, as well as select the boot priority and quick tuning profiles for the system. A cool new addition is the fan profiling, direct from the easy mode. The fan speeds on the left show a fan spinning, and the faster a fan spins, the faster the animation. But click on the button marked ‘Manual Fan Tuning’ and after a quick test of the system fans, the following menu appears:
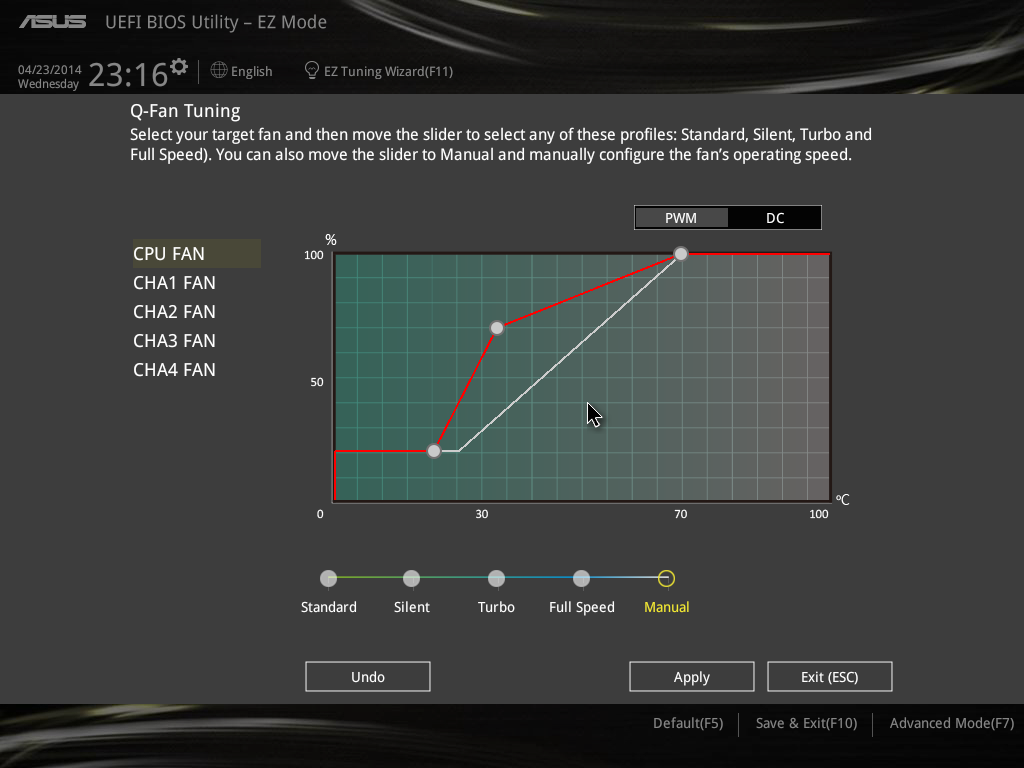
Users can select each of the five controllable fan headers (the sixth is for liquid coolers that want 100% pump operation) in either PWM or DC mode. Each fan can be referenced to one of the four preset options (standard, silent, turbo, full speed) or users can go manually and adjust a three point gradient. Ideally I would prefer more points in the gradient and a hysteresis option here in the BIOS as well, but we will look forward to any future adjustments.
Also part of the Easy Mode is the Tuning Wizard. This is a button up the top, above the CPU Temperature. Selecting it gives the following screen:
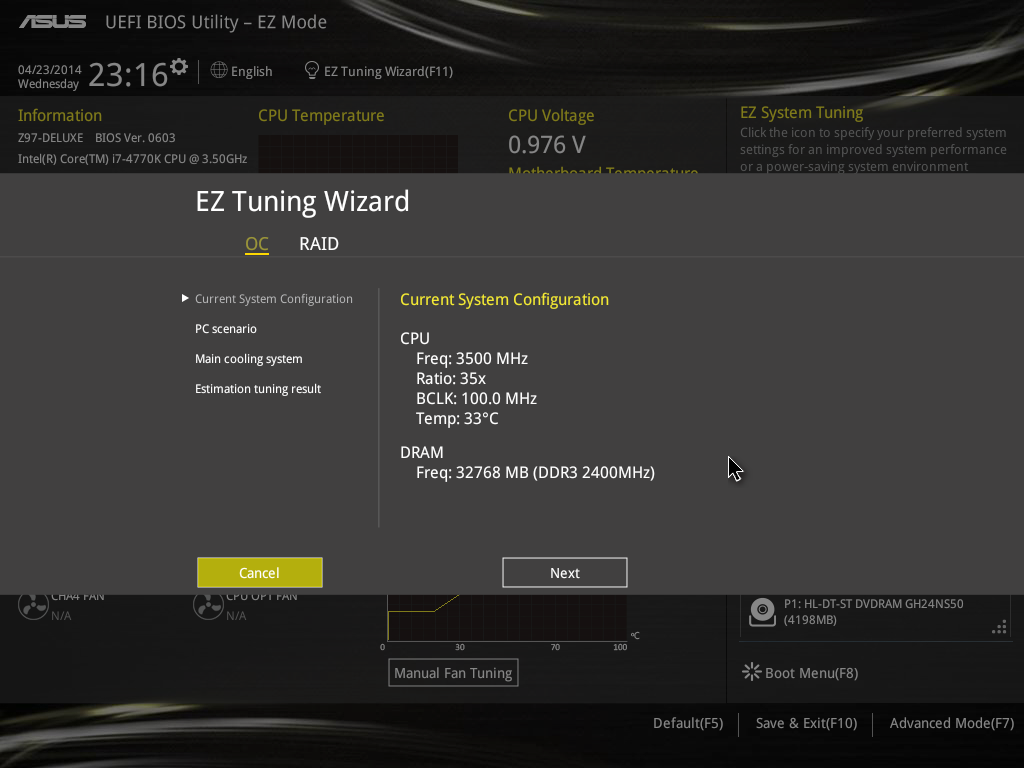
On previous ASUS motherboards I had lamented the lack of variable overclock options. It was often just ‘Tuner’, or a choice between ‘Fast’ and ‘Extreme’. ASUS took this onboard from several sources and developed this interface, allowing users to select what they do with their PC:

What sort of cooling is being used:
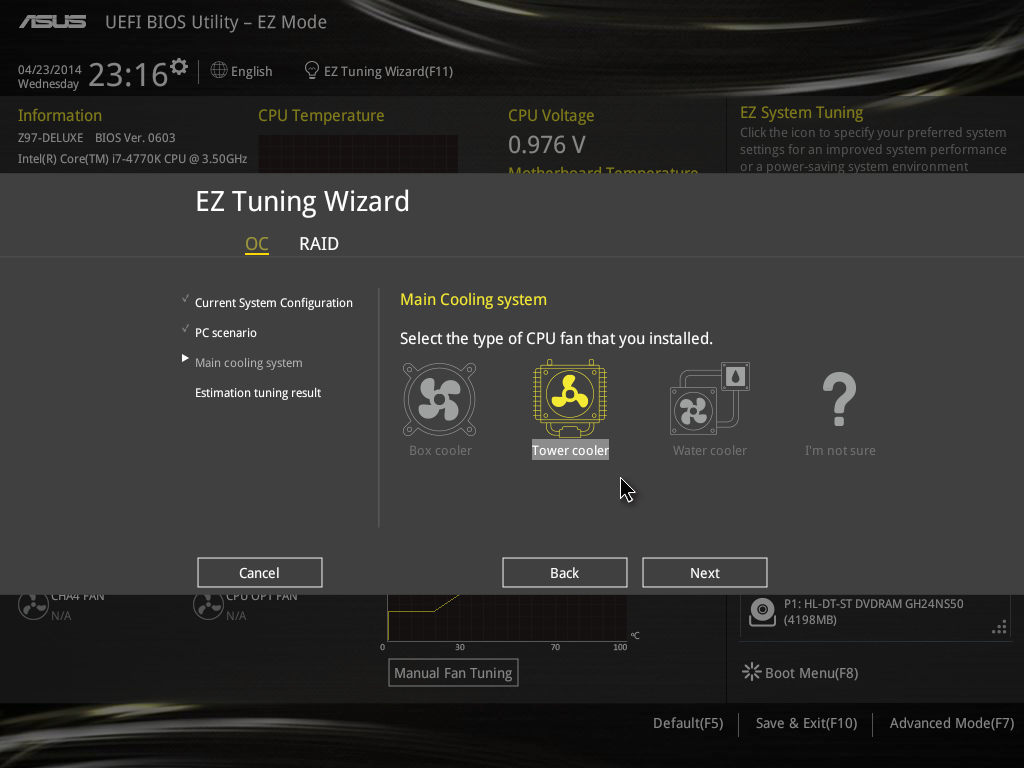
And then the BIOS gives an estimate of possible overclocks when the Tuning Wizard is implemented:

So in this case, the BIOS is predicting (based on internal testing and a lookup table) a 28% increase in CPU speed (3.5 GHz to 4.5 GHz) and a 84% boost in DRAM speed (1333 MHz to 2450 MHz) when we had an i7-4770K equipped with 32GB of Corsair DDR3-2400 C10. At present the BIOS is not that smart, so if the overclock fails the user will have to get into BIOS and set defaults if their CPU cannot take the speed and voltage. Because Haswell is so varied in its performance (e.g. I have a CPU that fails 4.3 GHz at 1.35 volts), ASUS has to draw the line between aggressiveness on auto overclocking against the likelihood that some CPUs are bad overclockers. If an overclock fails, try retaking the tuning and selecting the lower cooling option; this will cause the temperature limits in the OC to adjust to hopefully accept an overclock on a poor processor.
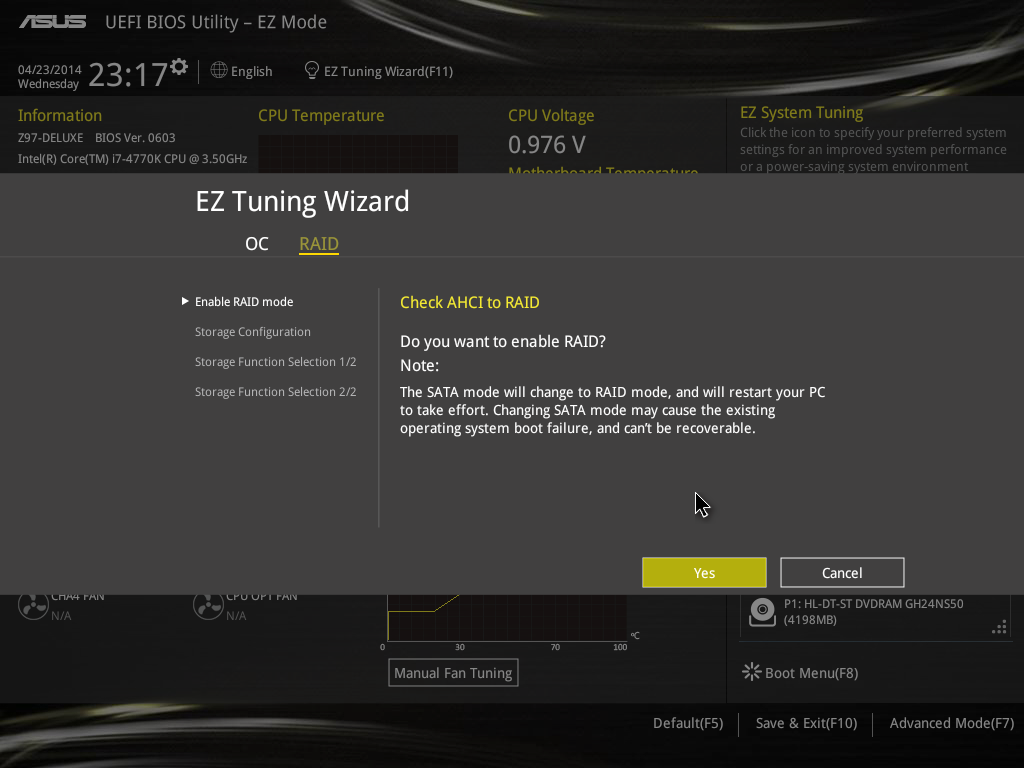
Astute readers will notice that Easy Tuning also has a RAID function. Part of the feedback ASUS has received from the 8-series is the ability to build RAID drives using hardware drivers. This tool is designed to take control of the Intel RAID interface, and users can build arrays through the BIOS instead. I want to take this feature for a spin, but I will leave that for another ASUS review.
Moving into Advanced mode also affords an adjustment from Z87. ASUS is being more economical with the space, and the use of a different font makes it more readable with no need to put significant gaps between each row of text. As a result, we get a Hardware Monitor on the right hand side with all the poignant information about the CPU, DRAM and Voltage. I would have liked the motherboard name and BIOS version in there as well, just to complete the set. At the bottom is the help menu. Moving it to a longer horizontal side allows more text on the same line and less strain on users who read about controls to keep adjusting their eye line. That might sound like hooey, but I see it as a good way to use space.

ASUS has definitely regressed in a couple aspects in the design however. It is quite hard to explain in text without a video, but it all comes down to the spacing of the tabs and buttons at the top.
When we use a tabbed web browser with multiple tabs, each tab gets its own section in the tabs area. Each of these tabs is a fixed width, no matter how long the text is. The same with icons, these are a fixed size no matter what the icon contains. When we click on a tab, a whole new window appears with new information, or in the case of Chrome, it is a new OS process. With bookmarks however, these are of variable length up to a maximum. In the Chrome bookmark bar, both folders and individual links are variable in length, because you are in the same process or creating a dropdown.
With that in mind, look at the ASUS BIOS. The list at the top, starting with the date, time, ‘English’, ‘MyFavorite(F3)’, ‘Qfan Control(F6)’ are all of variable length. The list of tabs underneath this, ‘My Favorites’, ‘Main’, ‘AI Tweaker’ are also of variable length. The downside of having it done this way means that if a user wants to click on an option, there is no chance of ‘guessing’ where the right option is due to the variable length nature.
Perhaps I am being a little sensitive here. I can imagine that it might not affect a significant number of people. However in the back of my mind, it might improve the user experience. Other manufacturers have used icons with embedded text to represent these menus, such as a spanner for ‘Tools’ or a temperature meter for ‘Monitor’, which with the right icons/images might be a preferred option if there is space. Because we are dealing with higher resolutions and better image fidelity in the graphical BIOSes, I cannot imagine that static images would affect the redraw rate much, especially compared to the new side-swipe animation ASUS has enabled between selecting these tabs.
With the side-swipe, like on a mobile device the text follows the swipe, and in the ASUS BIOS the side-swipe has to complete before the text is selectable the page. Unfortunately the side-swipe is not as smooth as a mobile device because of limitations, and it takes a good 10-15 frames to complete, or 0.3-0.5 seconds. This might frustrate some users who want to access certain features quickly. The system does allow double tabs to skip tabs, but the side swipe still has to finish before options can be selected, giving a small amount of lag. Thankfully there is an option to disable this, under Tools called 'Setup Animator'.
The purist/pedant that I am aside, there are still some new and updated features in the BIOS that work well. The My Favorites menu has adjusted so users access a setup map (like a sitemap) in order to select the options for My Favorites:
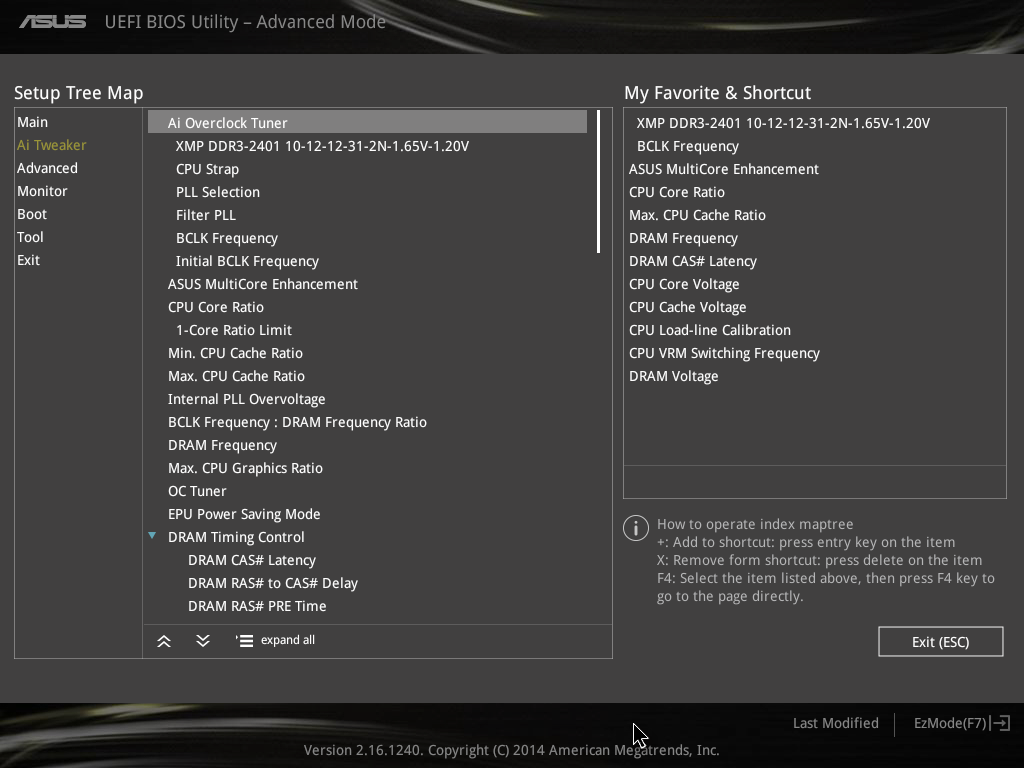
With the color scheme and font, this is actually really easy to use. Previously users had to navigate to each option and press F4/right click to add to my Favorites, but this condenses that selection into a single menu speeding up the process. The options that I usually use for overclocking my home systems are selected in the screenshot above, which when we navigate to My Favorites gives:

It should be noted that in order for an option to be selectable on the Setup Tree Map, it has to be visible in the BIOS. This means that if you want to change the CPU fixed voltage, the option has to be set to 'Manual Voltage' before the option appears to set it in the Tree Map. This is a little annoying, particularly if you are in the My Favorites menu already and decide to add options - as the menu does not refresh, you have to access another tab and navigate back. At this point it might be worth ASUS' in house overclockers to offer their own My Favorite presets for enthusiasts to use.
For the settings that involve voltages or specific values (such as CAS Latency), the BIOS gives in indication of the current value, whereas the help section at the bottom will display the range and granularity of the setting.
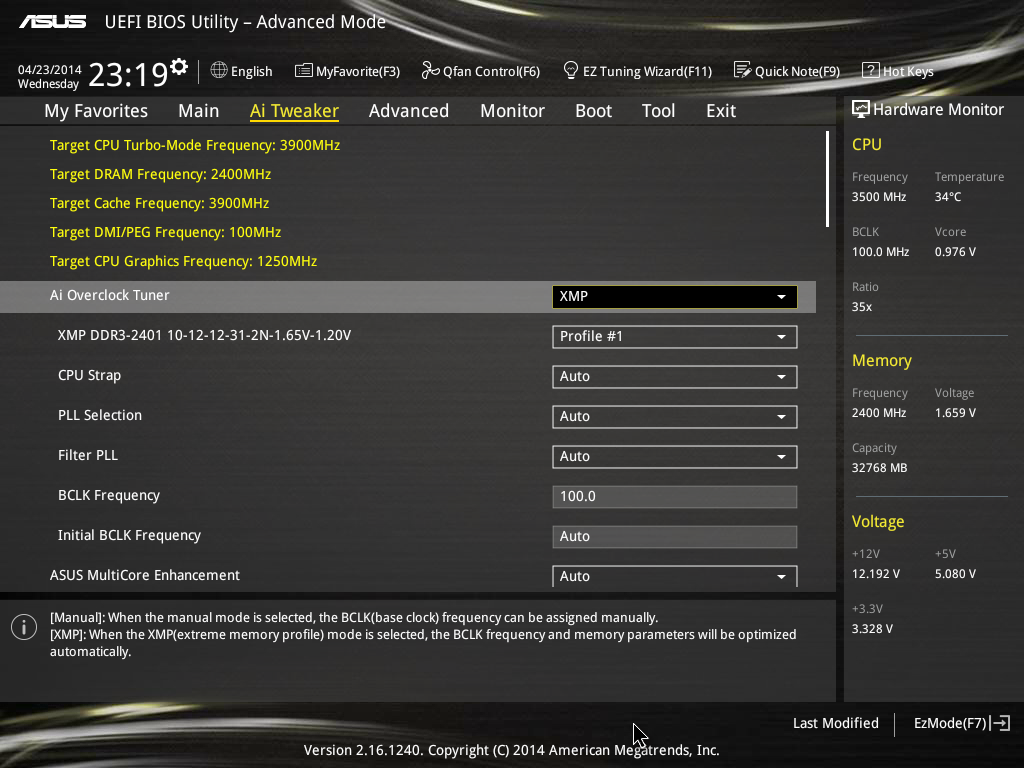
The full overclocking options are in AI Tweaker, and these follow the previous BIOS iteration starting with frequency settings, with sub-menus for DRAM timing and DIGI Power, and then voltage settings. As mentioned the Board Overview, for extreme users wanting to use sub-zero cooling, the OV_CPU jumper on the motherboard has to be enabled to allow extreme voltages:
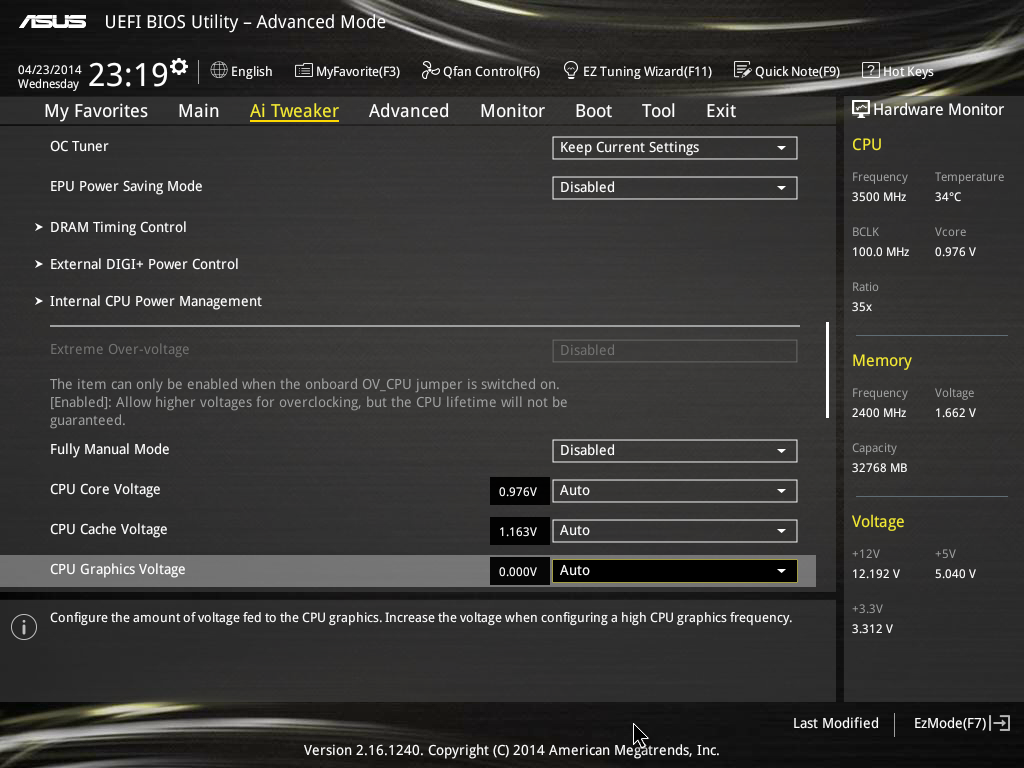
Load line calibration and switching frequency options are in the DIGI+ Power Control sub-menu, whereas power limits are in CPU Power Management.
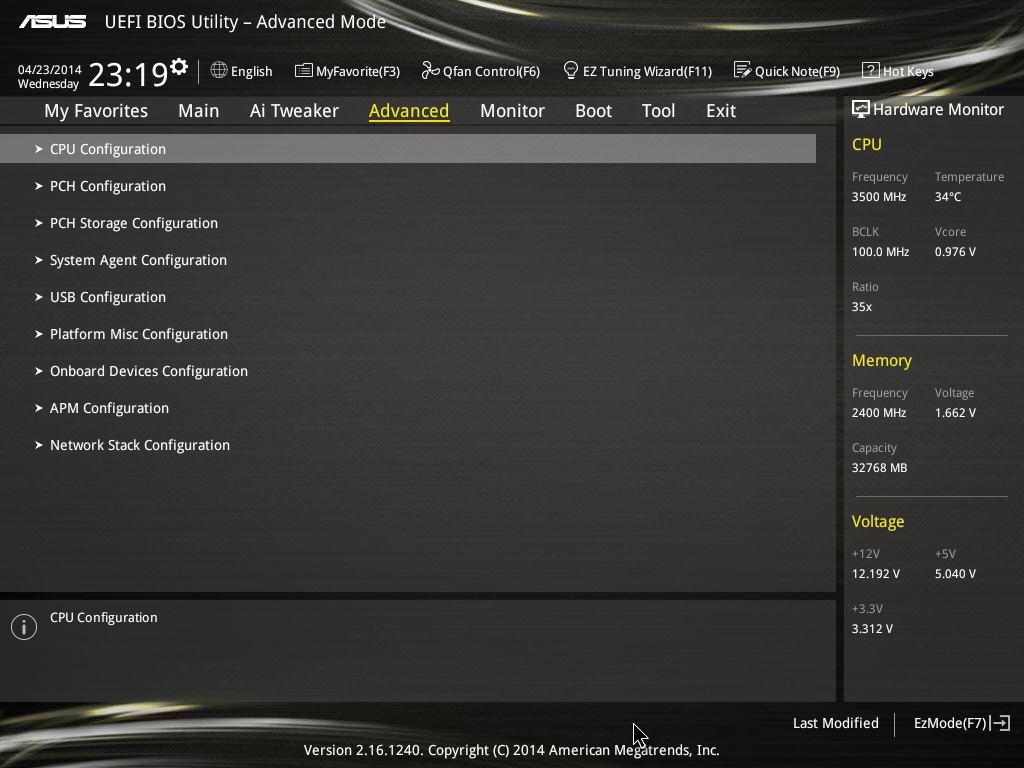
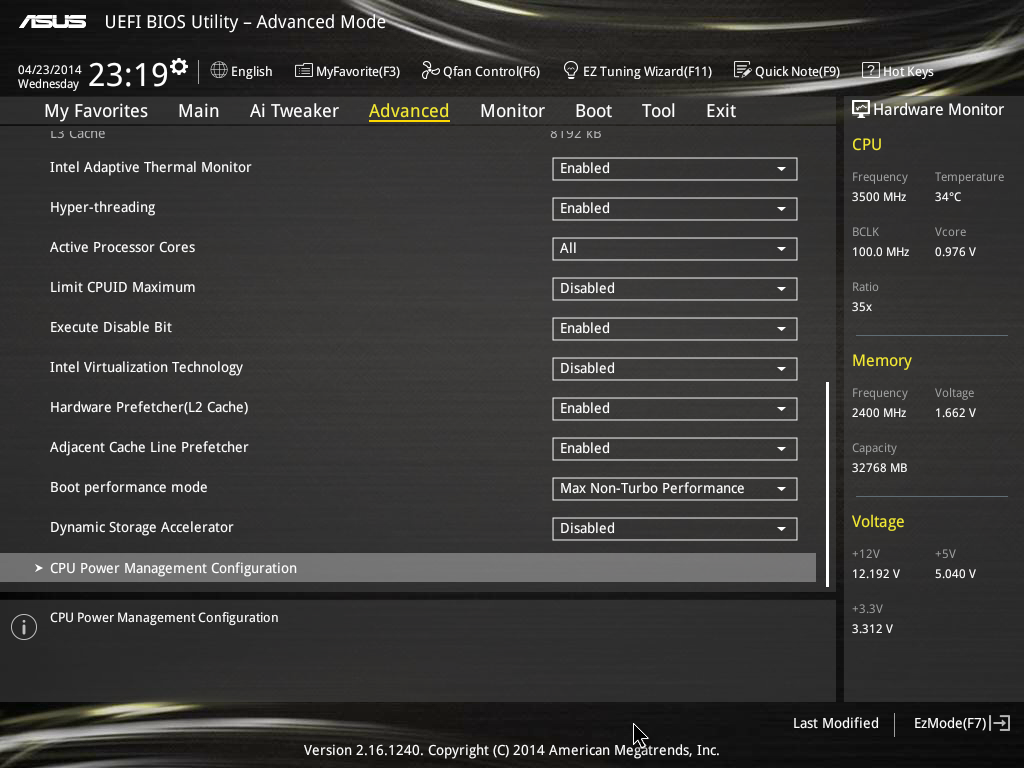
Because of the use of switches to enable/disable certain features when others are in use, it pays to understand certain options in the Advanced tab. The usual options are all here, such as HyperThreading in the CPU Configuration menu:
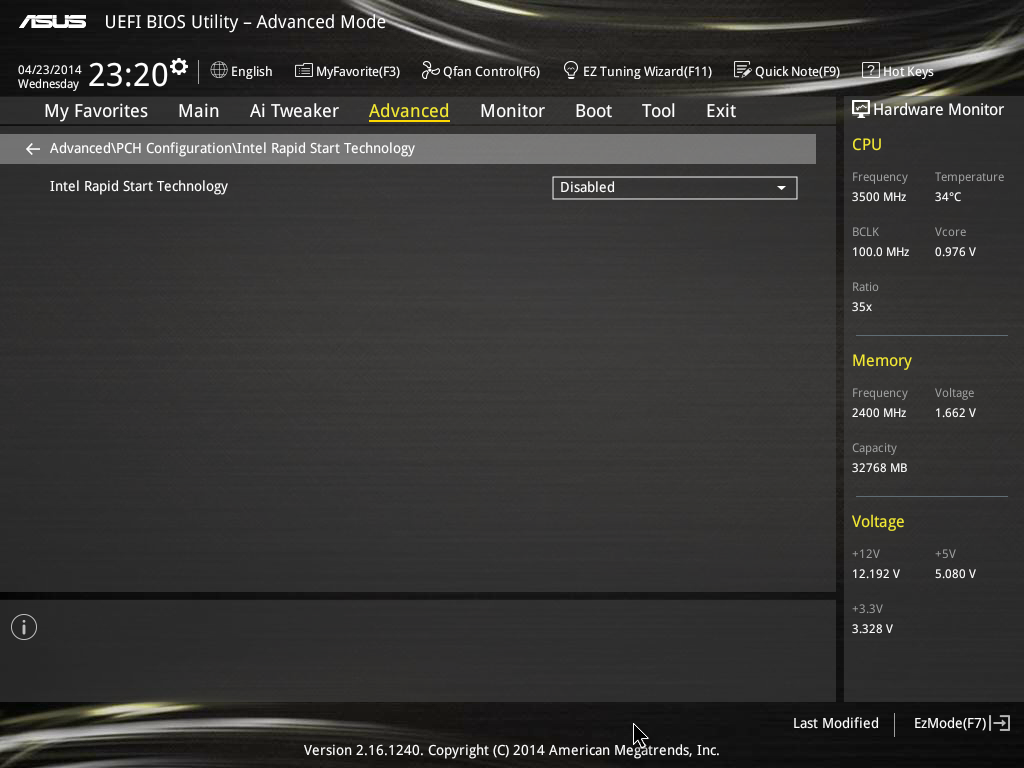
RST/SRT in the PCH Configuration menus:
Display choices in the System Agent Configuration menu:

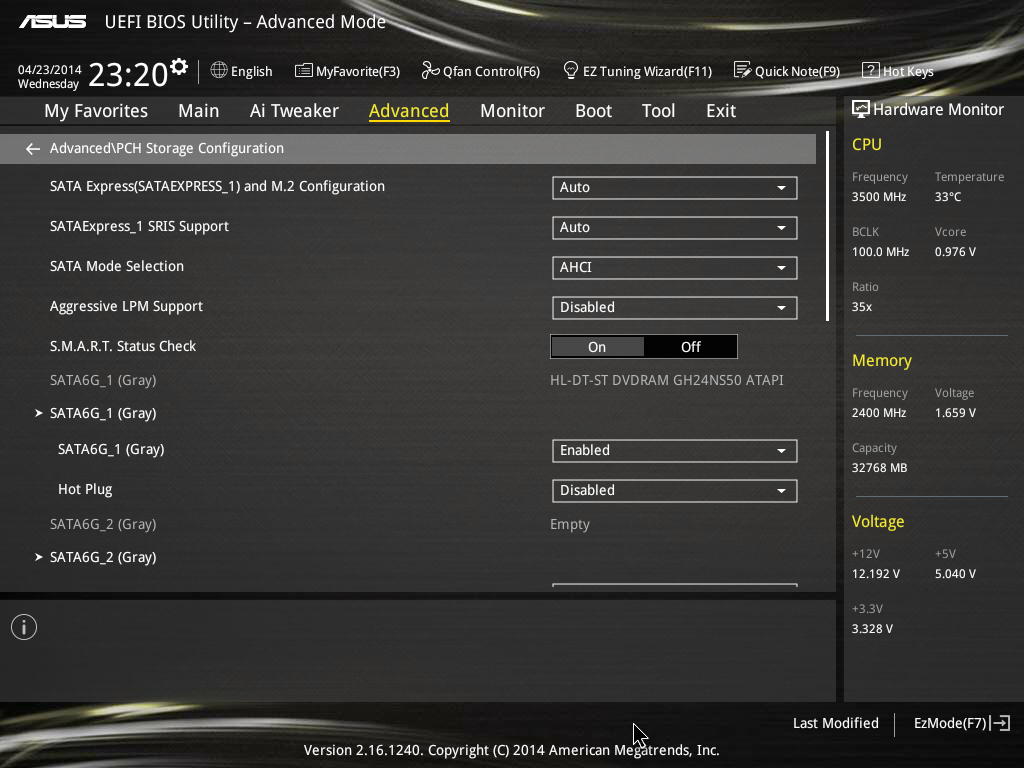
Out of the two most important menus in Advanced, the PCH Storage allows users to force select between the chipset SATA Express port and the M.2 slot:
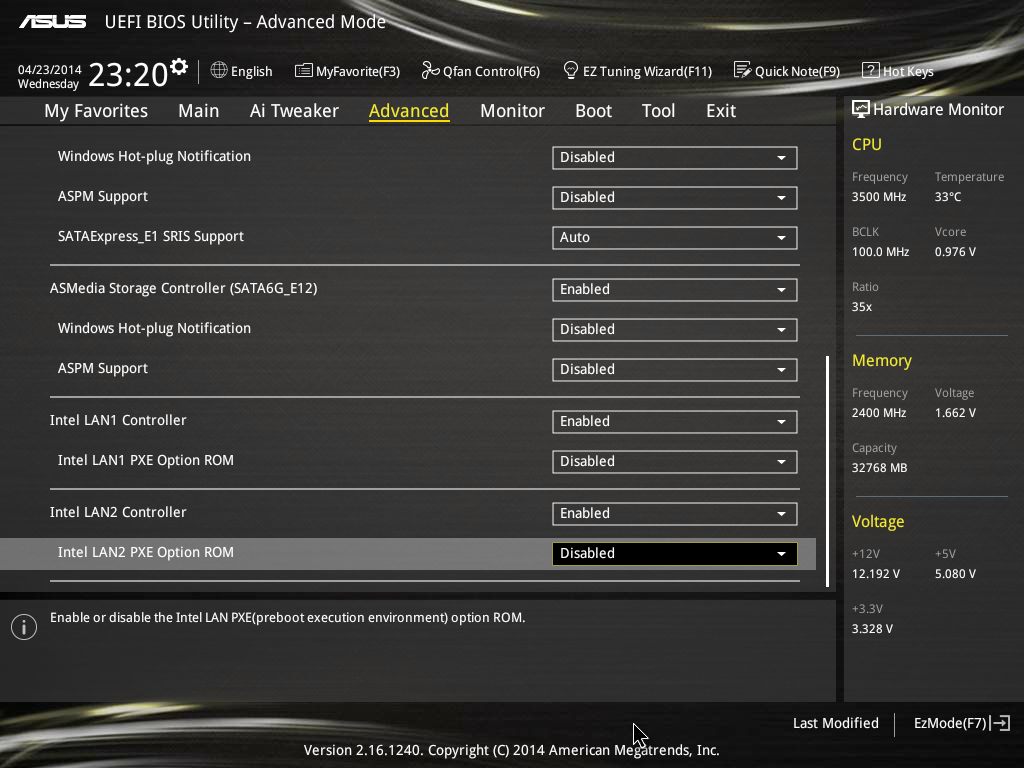
Whereas the Onboard Devices menu will allow users to force select between x4 on the final PCIe slot for dual Thunderbolt 2 card, x2 on the final slot for two of the USB 3.0 ports on the back, or Disabled to use the second SATA Express port.

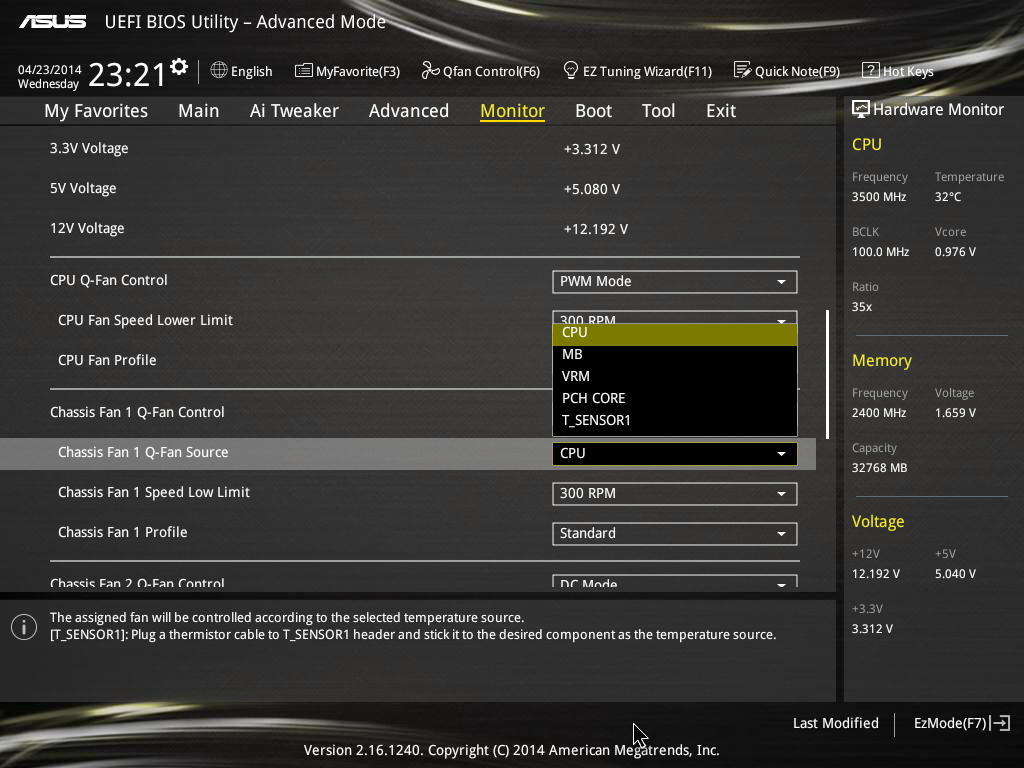
The Monitor tab contains the onboard sensors, as well as the option for Q-Fan Tuning. This tuning needs to take place before using the custom graph adjustments in the Easy Menu, but the easy menu will direct users here automatically. In this menu however users can tie each of the fan headers to a specific sensor on the motherboard, including the T_SENSOR if a user wants to use their own thermocouple.
The Boot tab contains the fast boot options, the boot order and also the boot override features:

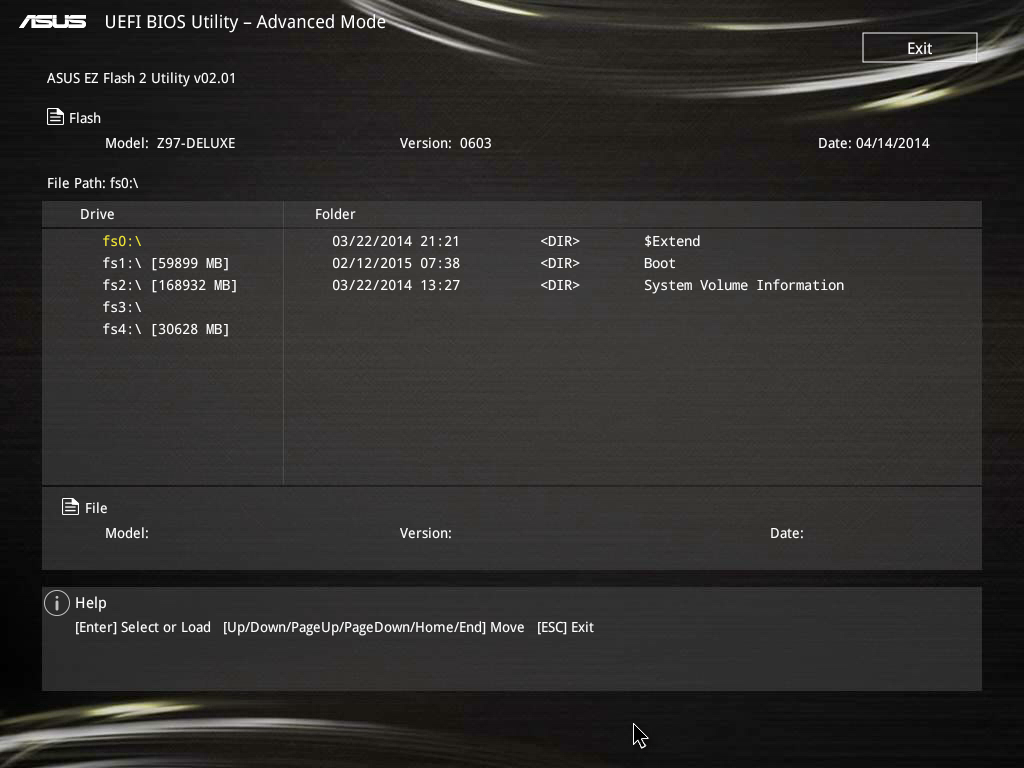
To update the BIOS, ASUS still has the EZ Flash 2 tool in the Tools tab:
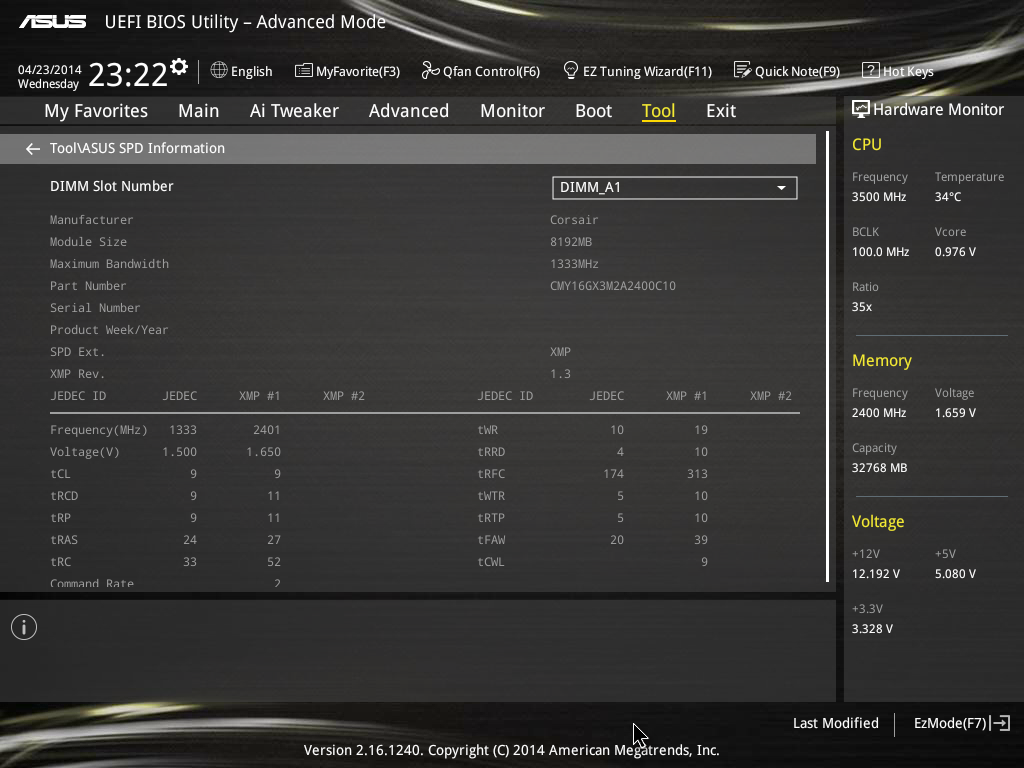
The Tools tab also contains options for saving overclocking profiles and viewing DRAM SPD information. Because of the ability for ASUS to adjust font sizes in this new BIOS revision, even though the SPD info page has to use the Courier font due to the amount of information, we can get it all on one screen:
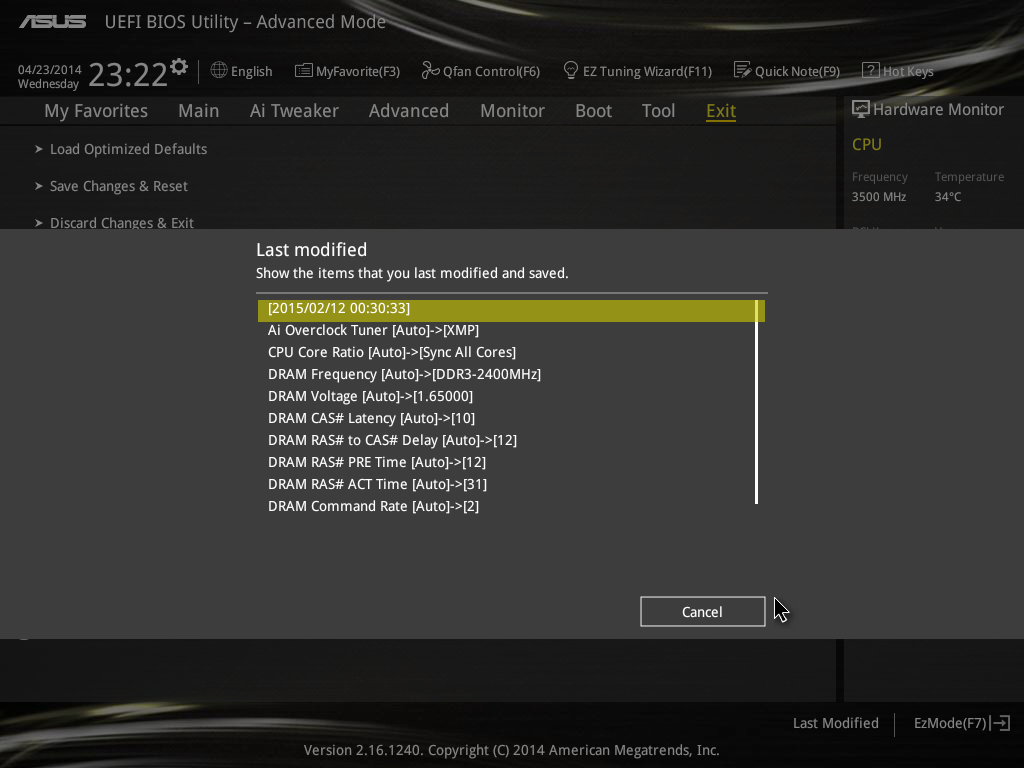
Carrying over from the last generation of BIOSes is also Quick Note and Last Modified. Quick Note is essentially a small note pad to write notes about the BIOS, and Last Modified indicates which settings in the BIOS have changed since the system booted:


45 Comments
View All Comments
Eidigean - Friday, May 16, 2014 - link
First off, This is a great review Ian. The in-depth details of shared PCIe lane distribution between the x4 slot, x2 M.2, and x2 SATAe helped me make a decision...I'm looking for Thunderbolt 2 and two x4 M.2 SSDs. The only board that seems like it will fit the bill is the GIGABYTE GA-Z97X-UD7 TH. Reason being, it's the only board that provides x8/x4/x4 from the CPU while also providing x4 from the Z97 for the Thunderbolt controller. This will allow for a GPU and two Samsung XP941 M.2 SSDs in a RAID 0.
An alternative I'm kicking around is the Asus Z79-WS with its PLX switch; allowing x16 for the GPU, two x4 M.2 SSDs in two x8 slots, and the ASUS Thunderbolt 2 controller in the x4 slot from the Z79.
Ian, could you get your hands on the two Samsung XP941 sticks that Kristian was testing?
Eidigean - Friday, May 16, 2014 - link
The ASUS Z97 lineup would be better if ASUS put a x4 slot in place of the middle or bottom x1 slot and shared 4 lanes from the x8 slot when needed, allowing for x8/x4/x4 in addition to x8/x8. Intel allows for it, and only one vendor (GIGABYTE) is doing it.Eidigean - Friday, May 16, 2014 - link
There's actually another vendor that *almost* meets my requirements, the ASRock Z97 Extreme6. From their user manual:* If M2_1 slot is occupied, PCIE2 slot will run at x8 mode, and PCIE4 slot will run at x4 mode.
That would allow me to run one XP941 stick in the motherboard's M.2 socket, and the other in the PCIE4 slot. The missing feature is Thunderbolt 2; which is only offered by ASUS and GIGABYTE.
Ian Cutress - Friday, May 16, 2014 - link
Hi Eidigean,I have the Z97 Extreme6 in for testing, should have a review (with a single XP941) incoming. I've got some data regarding the impact an x4 M.2 has on GPU performance, stay tuned for that.
-Ian
Taurus229 - Friday, May 16, 2014 - link
Considering this is a $400.00 board, I feel that no one should have to play musical chairs with Sata inputs! Asus missed the boat here!austinsguitar - Friday, May 16, 2014 - link
one does not just simply pay 400+ dollars on just a motherboard with thunderbolt 2's.... this is a little bit overkill and stupid to the common consumer/ marketing executive. This premium doesn't make much since....DMCalloway - Friday, May 16, 2014 - link
Great review! Unfortunately, one of the best selling i7 chips (2600k) isn't in the benchmarks. I do like the progress being made with the UEFI BIOSs. Thanx for the review Ian.EricPraline - Saturday, May 17, 2014 - link
Many high-end motherboards these days use special audio capacitors for 'better' sound in the audio area of the motherboard. The amount of capacitors used in the audio portion of newer motherboards seems to vary using anywhere from 6 to 14 or more depending on the motherboard. Does using more capacitors for audio roughly correlate with a better sound? Why is there a difference in the number of audio capacitors used among high-end ALC1150-based motherboards, even by the same manufacturer (e.g., Asus)Haravikk - Saturday, May 17, 2014 - link
I find the selection of SATA ports and the juggling act of connecting them a bit weird; I thought that one of the advantages of SATA Express was that you could still use it as two ordinary SATA ports, only getting the increased speed when you connected a full SATA Express cable? With that in mind I don't see why this really needs so many additional, regular SATA ports anyway; an extra two would be enough for most people, as that gives you either six regular SATA drives, or two SATA Express and two regular SATA. Or they could even have gone for four SATA Express which would be even better as it gives you four to eight ports.I dunno, it just feels a bit like an odd in-between standards kind of mixture; since Intel will most likely be pushing to increase PCI lanes on future processors then it just seems like if you need so much connectivity you're still better going for a dual processor motherboard, or waiting a year for more Thunderbolt friendly processors.
Laststop311 - Monday, May 19, 2014 - link
Seems to me Intel needs to stop cheaping out on the pci-e lanes for its mainstream line. Now that sata express needs 4x pci-e 3.0 lanes to function to it's maximum. Asrock Extreme 9 is the only board right now that allows you to connected an SSD directly to the CPU using 4 pci-e 3,0 lanes and surprise those drives function the best. With skylake and Z107 intel really needs to step up its pci-e lane game.