ASUS Maximus V Formula Z77 ROG Review
by Ian Cutress on March 25, 2013 2:30 PM EST- Posted in
- Motherboards
- Asus
- ROG
- Z77
ASUS Maximus V Formula Software
In the past couple of years, I have often touted ASUS software as one of the better solutions on the market, covering most of the bases in terms of what software should be doing as part of the motherboard package. This typically falls under the heading of AI Suite II, an all-in-one toolbar for the separate optional menus that can vary between the product line or to accommodate new functionality. The ROG motherboards, like the MVF, usually get the best versions of the software first, along with a themed skin to complete the experience.
The first anyone sees of the package is from the Install DVD, which splits the package into two halves between drivers and software. Each of the halves offers a two click Install-All, although users can select which options not to install before proceeding with the automatic installation. The system will install the options with a sufficient number of reboots, although after the final reboot the system will not load up the DVD again – users will have to reload the DVD to access the software half after the driver half and vice versa.
I did come across a minor issue with my Install CD, which is not entirely representative of all end user experiences – part of the software suite failed to install based on a bad disk. It would cause errors that would influence the system in undefined ways, such as missing half of AI Suite, or not allowing me to install various GPU drivers. In order to solve this, I had to go online and download AI Suite in its entirety and install the latest version therein; the rest of the disk installed without a hitch after this. I could have had a bad disk, but anyone could get a bad disk. Unfortunately it has the ability to taint the experience somewhat, especially on the side of the person trying to fix the problem.
After installation of the drivers and software, several utilities automatically run as window loads, along with applying an ROG desktop theme with backgrounds, icons and mouse pointers. After staring at the standard Windows 7 desktop for over 60+ motherboard reviews these past couple of years, any change seems like a good change! The following icons are also placed on the desktop:
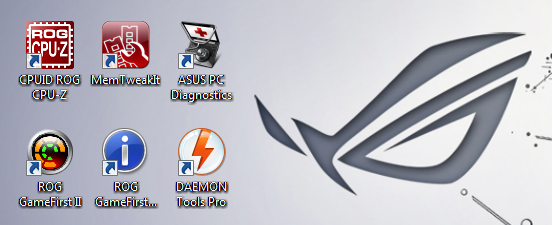
CPUID ROG CPU-Z
Much like the themed CPU-Z versions we have seen from EVGA and Gigabyte, ASUS also have a version which we saw with the X79 ROG range. For non-enthusiasts, CPU-Z is essentially a system verification utility – it tells the user what the system is running in terms of CPU, motherboard, memory, and what speeds all these components are running at. CPU-Z is the basic tool used by enthusiasts to verify their system to others, either by screenshots or uploading a submitting a verification request to the CPU-Z servers.
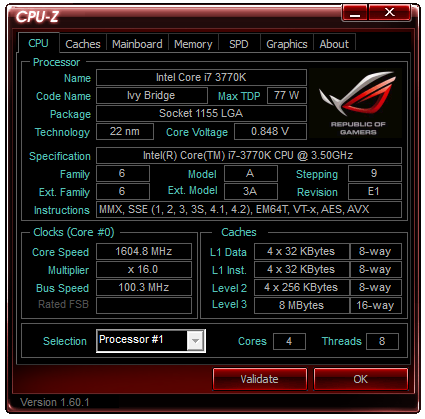
When extreme overclocking, it is often standard to have two CPU-Z windows open showing the CPU and Memory tabs open in order for screenshots to verify what model and speed is being used during testing. We also use it in our AT overclock testing, to verify turbo modes are being accurately applied and reported load CPU voltages.
ASUS PC Diagnostics
Have you ever had an issue with a system, only for the manufacturer’s support team to request that you download, install and run a third-party program such as AIDA and submit the test file to them? A couple of motherboard manufacturers are now attempting to streamline this process by using their own software – ASUS has created PC Diagnostics for this reason.
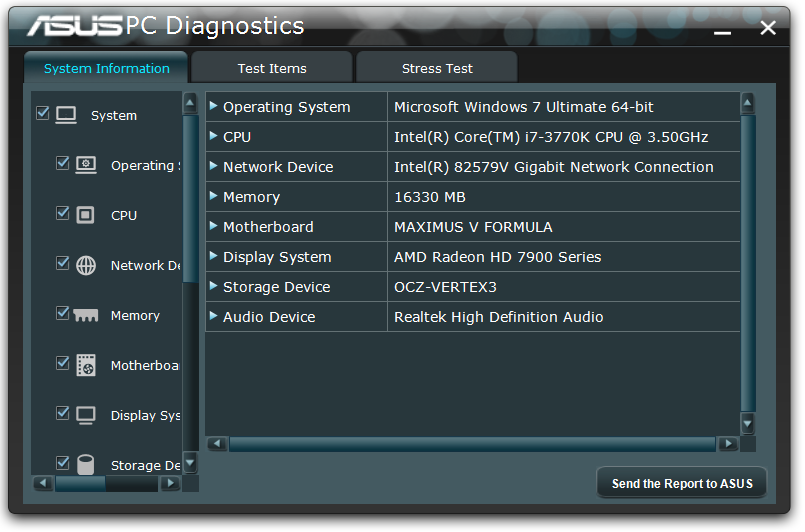
The software allows users to submit a report of what their system is direct to ASUS, along with all the extra info ASUS may need to collect (chipset driver versions, for example). The software also offers a small test section in order that the system is capable of the basic tasks.
ASUS MemTweakIt
Tools to adjust memory options while in the OS are few and far between. In the spirit of tweaking and competition, part of the ROG package is MemTweakIt – software to adjust as many memory sub-timings as is possible in the OS. It also incorporates a DRAM Efficiency Score for ASUS users to compare how ‘tight’ their memory timings are compared to others.
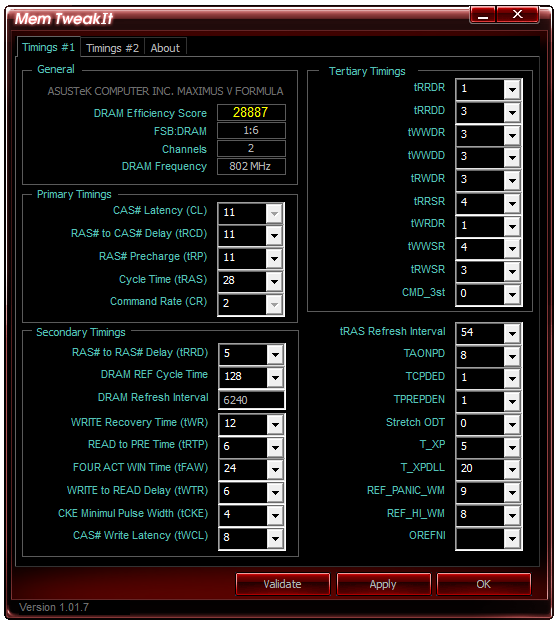
We used MemTweakIt in our overview of Ivy Bridge memory performance as a synthetic base to predict optimal % improvements (as it is very easy to show synthetically better memory in read/write speeds, but that often does not translate into real world improvements). For the most part, the MemTweakIt score did represent a good indicator of memory kit difference for cherry picked benchmarks.
ASUS EZ Update
One critical point of software packages I have been calling manufacturers out on recently is the ability for the software package to update itself. MSI are currently leading the field with this and their LiveUpdate software which queries MSI servers for the latest BIOS, driver and software updates, downloads them automatically, and then installs them. ASUS’ version of this software is EZ Update, a basic interface for a simple job.
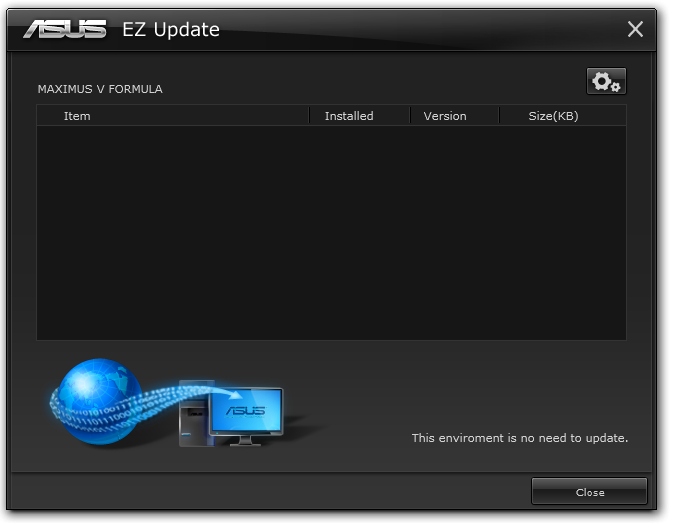
While nice in principle, I never got it to actually work – I installed old versions of software and drivers and tried to get EZ Update to get the newer files, but it always returned ‘This environment is no need to update’ [sic].
ASUS AI Suite II
The bulk of ASUS’ software process is encapsulated within AI Suite II, which comes in the form of a bar menu to load the different packages:

CPU Level Up
The automatic overclocking tool for ASUS is CPU Level Up, part of the TurboV EVO functionality. It gets a special place on the AI Suite II menu bar as the focus of an ROG motherboard like the MVF is overclocking.
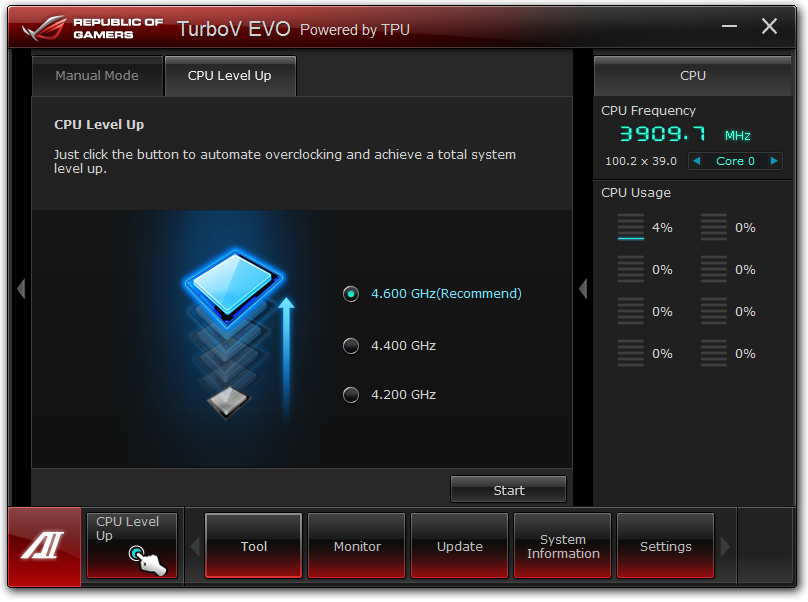
On our i7-3770K sample, CPU Level Up offers three speeds similar to the BIOS – 4.2 GHz, 4.4 GHz and 4.6 GHz. In order to apply these, the system restarts – it is worth noting that none of these options affect the memory or BCLK settings. I prefer this ten-fold over the previous system of ‘Fast’ and ‘Extreme’ overclock options, although ASUS have a way to go to offer the level of automatic overclock settings that ASRock do on the Z77 OC Formula. We tested this CPU Level Up options (successfully) in the overclocking section of this review.
TurboV Evo
The manual mode of TurboV Evo is as the name suggests – the manual overclocking tools for the operating system. Like the BIOS, our options extent to BCLK, voltages and multipliers, with Power Management in the DIGI+ Power Control menu.
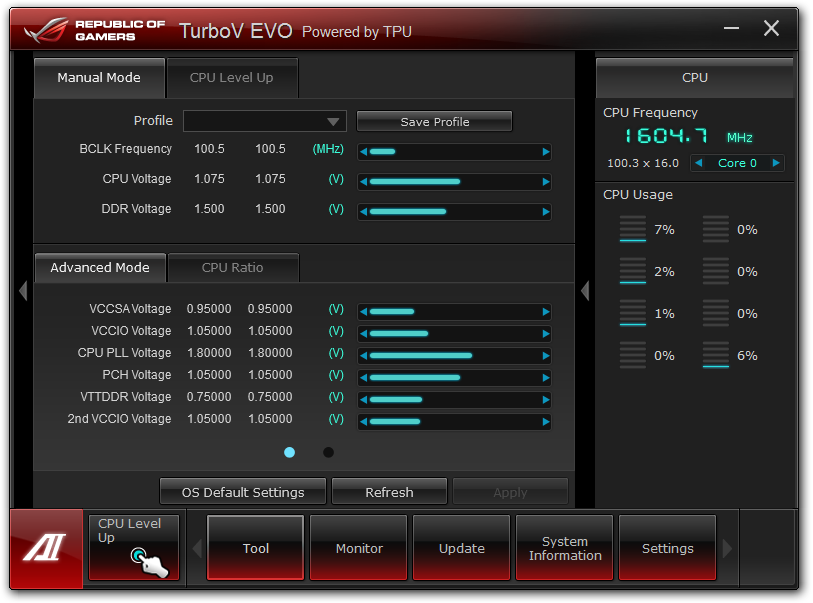
The options are well laid out, but I could find two ways to improve what we get. Firstly, I am a user that prefers to type voltages and values, rather than rely on sliders. Secondly, ASUS need something similar to Gigabyte TweakLauncher (GBTL) for extreme overclockers. GBTL is a simple small program with no GUI per se but allows extreme users to apply a setting instantly with minimal instability – ASUS could do with this (!).
DIGI+ Power Control
ASUS like to actively promote their all-digital power delivery solution, where users can adjust the CPU voltage response (similar to throttle response in cars) and current capabilities in CPU, DRAM and VRMs. For the regular user not accustomed to overclocking, this menu has no relative meaning, although for extreme users it allow an extra level of control, whereby affecting options such as voltage frequency will improve overclocking potential under sub-zero conditions. Another benefit for DIGI+ is thermal control, allowing to push the boundaries further still.

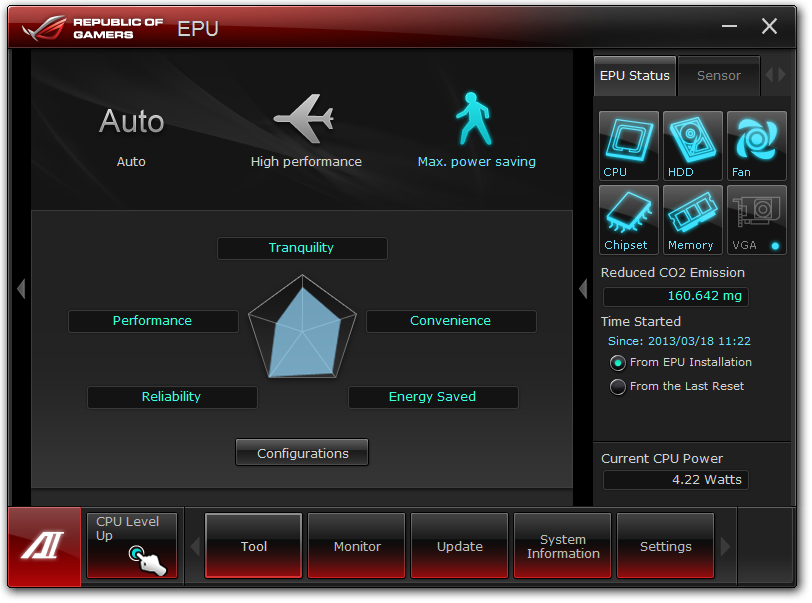
Energy Processing Unit (EPU)
Typically high powered enthusiasts have little to care about regards the power of their system – whether they consume 850W or 800W is of no concern, they want the best. However a business user may consider saving power to decrease office related costs on utilities. Now a business user wouldn’t necessarily buy an ROG board (the extra cost would outweigh any savings made), but the energy saving utilities ASUS offers span the entire product line, top to bottom. So it is there if you need it.
ASUS Fan XPert II
One of the big marketing points for the MVF is the obscene level of fan control that the software offers. Fan XPert II lays the smackdown at the feet of all other motherboard manufacturers in terms of fan control. I regularly rant about fan controls, and to summarize:
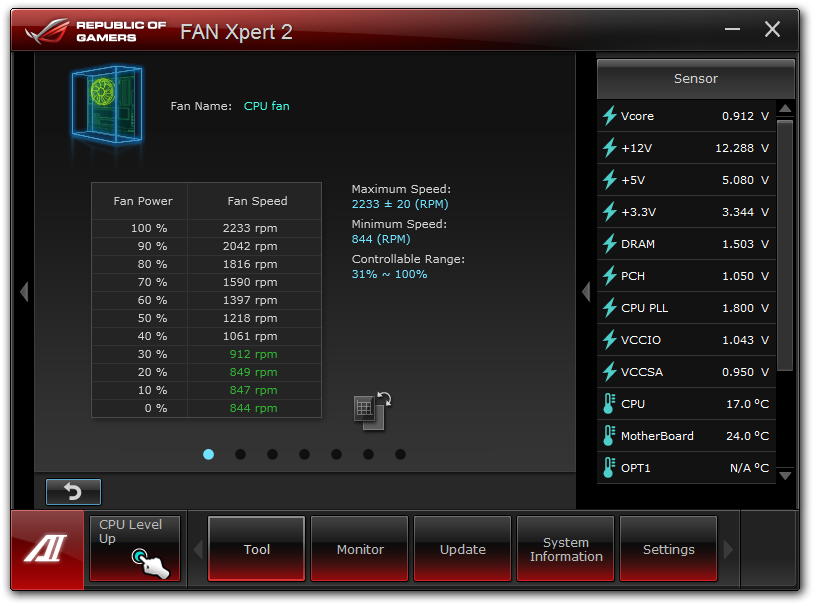
A common mistake is that a PC fan increases its speed proportional to the power applied. The assumption says that if I apply 50% power to my fan, it will run at 50% RPM. Reality is not that simple – a fan has a threshold power rating, such that below the power it will spin at a nominal RPM. Take for example my CPU fan:

Below the threshold power of 20% (so from 2%-20%), the fan spins at ~800 RPM (~30% of max). From 20% to 100% power, the fan speed increases roughly linearly with power applied.
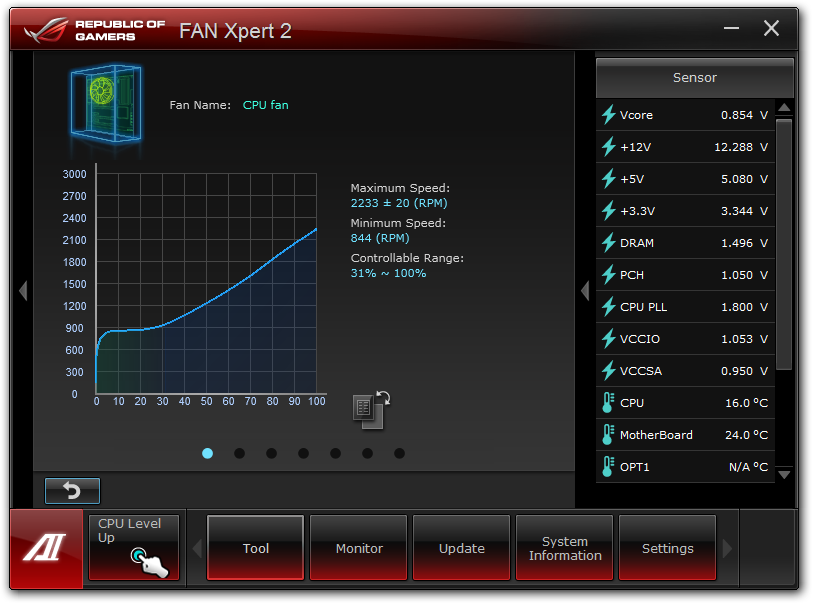
Most motherboard manufacturers do not recognize this – it is very easy (even with a 3-pin fan header) to obtain a graph like this. The only thing that affects the granularity of the graph is the fan controller used (anywhere from 2+ power points). With a graph like this, the manufacturer can have software to let the user select the intended fan speed as a percentage of the max, and interpolate what power is required to make the fan spin at that RPM.
Fan XPert II starts with testing all the fans plugged into the motherboard:
The testing gives the system a set of fan curves such that it has access to the following data:
This means that when ASUS offers a variation of fan modes (Silent, Standard, Turbo) they can apply the right power at the right time. It also allows for manual adjustments to do what they promise:
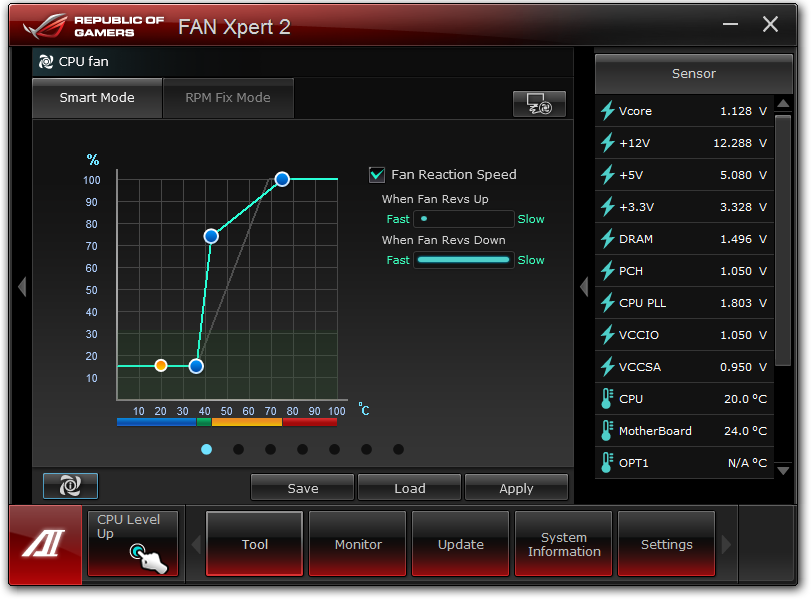
This graph shows a fan speed percentage against CPU temperature. The fan speed percentage calculated from the fan profiles tested above, rather than what most manufacturers do – just apply that percentage of the power and accept whatever fan speed comes out. It would be akin to asking for a 25m swimming pool, and getting a 30m swimming pool ‘because the company starts at 5m and then puts in what you want’. OK, perhaps a bad analogy, but so many companies are doing it wrong. So I am glad ASUS are doing it right. ASRock are getting there, albeit slowly, and I feel other motherboard manufacturers might be having a rethink on how they manage their fan headers.
The only step up now is how the system polls the temperature readings, as some areas of the system may want to read from one particular sensor rather than the other, or as a function of fractions of multiple sensors. ASUS keeps this technology for their Sabertooth line of motherboards due to their 10+ temperature sensors.
One final point I would like to make on Fan XPert II – unfortunately ASUS limit the manual fan graph above to a three point gradient, rather than manually allowing the user to select multiple points. Also the issue of hysteresis, whereby when the system cools down we want the fan to still spin fast to cool the system down quicker – ASUS have sort of tried to do this with the ‘Fan Reaction Speed’ options listed in the image above, however this does not provide a quantifiable solution as much as the rest of the package does. What we need is a forward and backward fan curve for each fan, such that the system can react appropriately and the user can control the fan speeds (and audible noise) both up and down the spectrum.
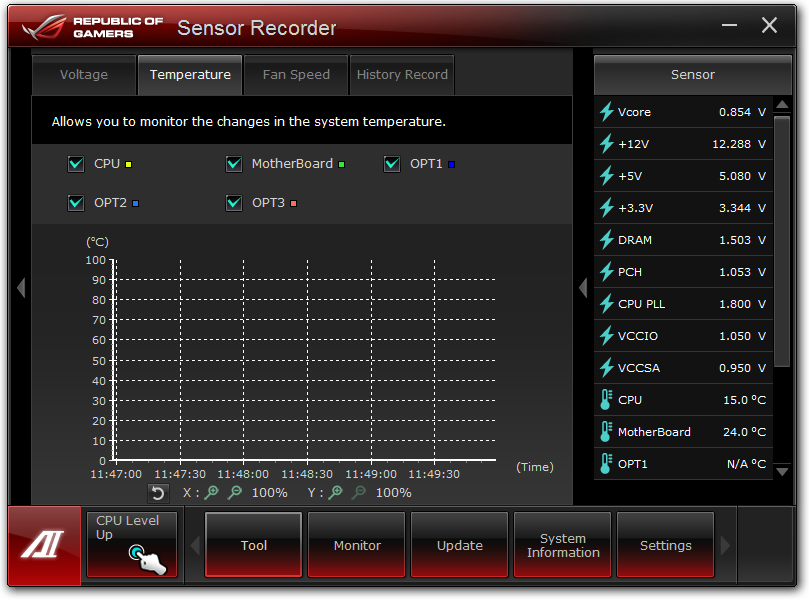
Probe II + Sensor Recorder
Part of the ASUS package tells you when temperatures are too high, or voltages spike, with a tooltip from the toolbar. This is Probe II in action, which allows users to customize the highs and lows that cause this message.
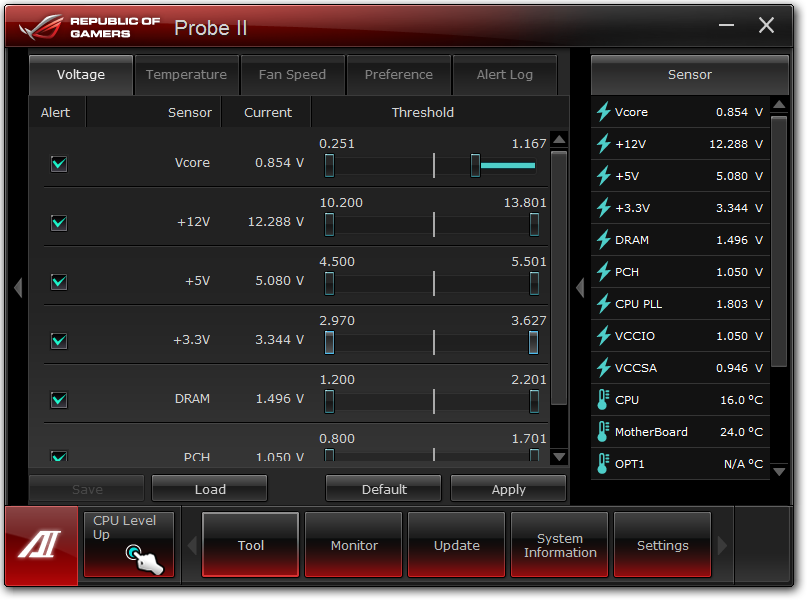
In the image above, the VCore notification for high CPU voltage has been decreased. In a similar vein to Probe II is the Sensor Recorder software, allowing users to monitor over time how the system reacts to loading and/or environment changes.
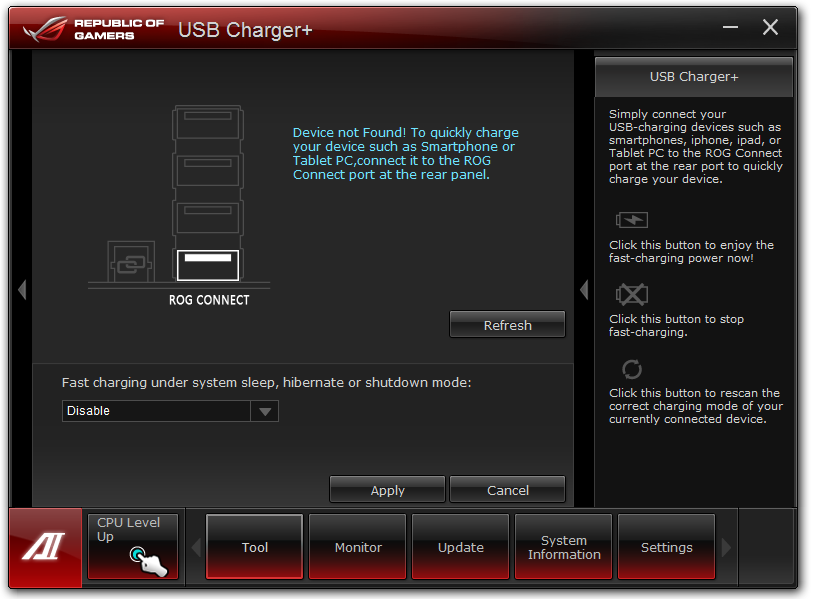
ASUS AI Charger+ and USB Charger+
Another feature rapidly gaining traction is the ability for USB ports to increase the level of current to the device attached. This allows devices such as tablets, phones and others to charge quicker if they adhere to various charging standards. AI Charger+ works from the USB 3.0 ports to any BC1.1 compliant device, and USB Charger+ controls the ROG Connect port for any device. Both tools allow for quick charging under sleep states or when the PC is turned off, although for best performance the device should be plugged in while the system is on before it goes into sleep modes. It should be noted that while other manufacturers offer quick charging capabilities, these often only extend to Apple devices - ASUS want to cater for all USB devices as necessary.
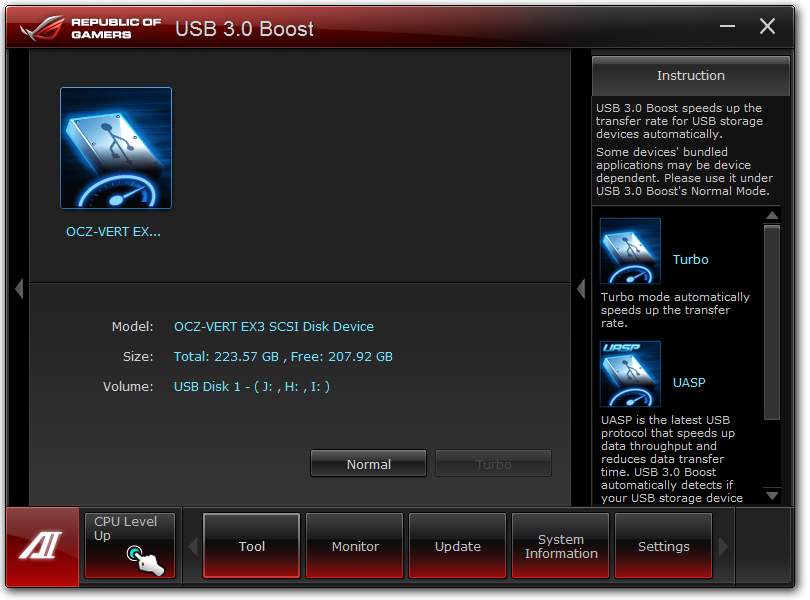
USB 3.0 Boost
As time goes on, protocols and the way devices interact evolves. Devices get faster, protocols change, and the way these devices talk to each other becomes more and more important. One of the important components in all of this is the operating system and the driver being used to navigate the data. If the OS or driver is old, the data transfer can be non-optimal due to the limited methods of communication, especially compared to the newest standards available. Thus when we pair Windows 7 with USB 3.0, there are improvements to be had.
ASRock have their XFast USB, which implements and injects an improved protocol driver into the OS and massively speeds up bulk transfers at the expense of latency. ASUS’ method is USB 3.0 Boost – giving updated drivers for chipset derived USB 3.0 ports and UASP protocol for capable controller ports with appropriate device s attached. UASP is an updated list of commands to help round trip latencies and bandwidth, providing up to an order of magnitude quicker transfers and small transfer sizes, as we tested in our P8Z77-V Pro review.
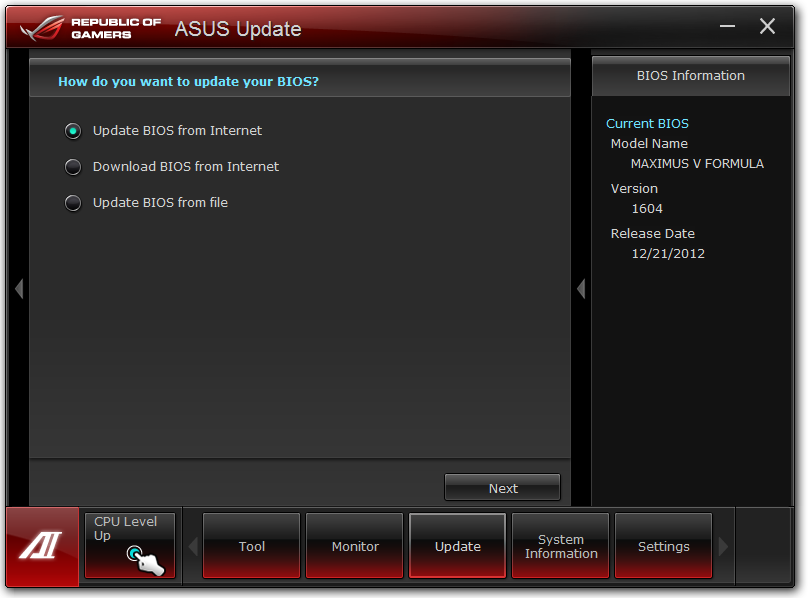
ASUS Update
Users not willing to play around in the BIOS for BIOS updates can do so via the software interface in AI Suite. The software will search the ASUS servers for the latest BIOS revision, download it and install it as required.
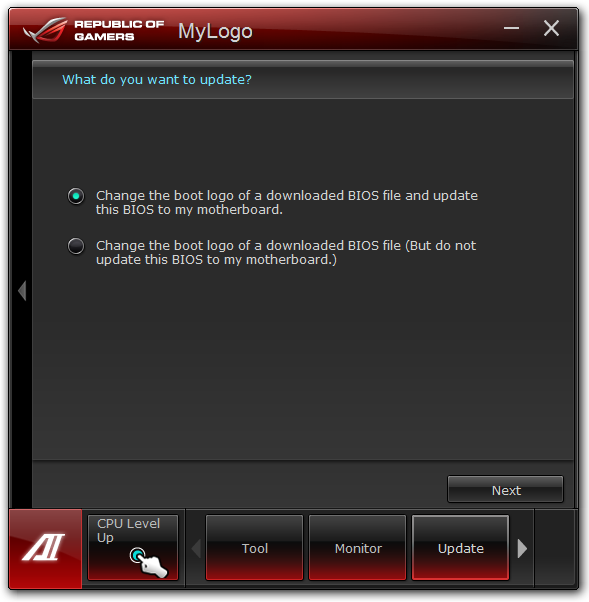
ASUS MyLogo
Ever wanted to update the image shown during POST? I did for a family system build once and it was well received. Similarly, clan gamers can all have the same POST screens and show off who they game for during the brief two to five second blip when the image is seen. The ASUS MyLogo software does this relatively easily in a few clicks.
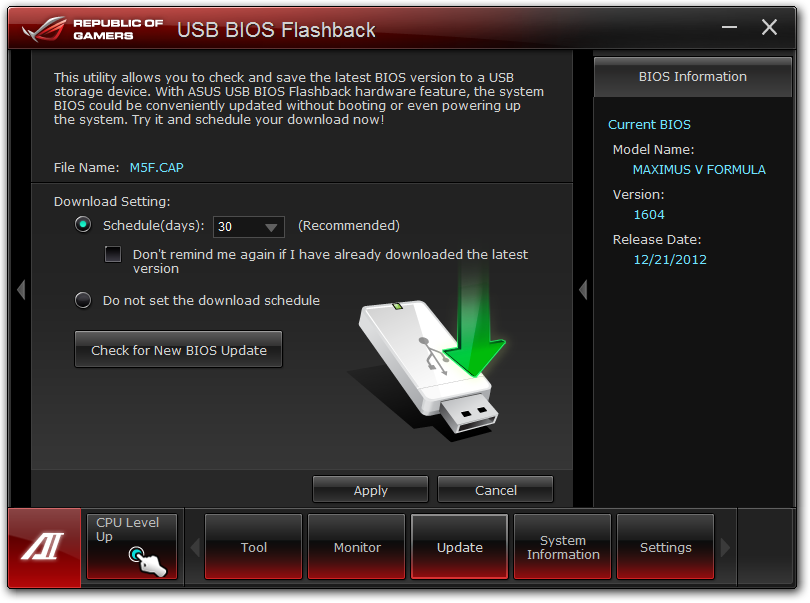
USB BIOS Flashback
Among the wealth of ASUS features that make proper sense to enthusiasts to include on everything is USB BIOS Flashback. This feature allows the user to update the BIOS via USB without a CPU, memory or a GPU installed. While it is predominantly a hardware feature, the software element in AI Suite allows a user to prepare a USB with a BIOS file without worrying about renaming the file.
ASUS GameFirst II
The final element of the ASUS software to mention is GameFirst II, the network management tool. Built from the same software license that a couple of other manufacturers use, GameFirst II has a few additional customizations not available elsewhere:
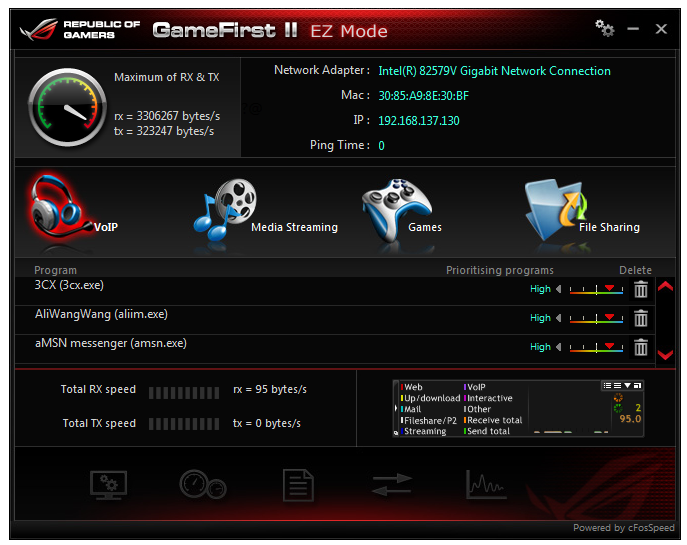
GameFirst II is designed to change the priority of different software with relation to the network interface – either wired, wireless, or multiples/combinations of both. Thus a gamer can, with a single click, give games priority over media streaming, or VOIP priority over file sharing.
The advanced features of GameFirst II are similar to those of other manufacturers that use the license – traffic shaping, adapter control, usage limits and protocol management, albeit with an ROG skin.


38 Comments
View All Comments
DanNeely - Monday, March 25, 2013 - link
Are the 3/8" barbs on the waterblock fixed; or can they be unscrewed and replaced with 1/2" ones?noeldillabough - Monday, March 25, 2013 - link
I'm actually interested in this question too; can we unscrew them and put in G1/4" fittings?DarkStryke - Monday, March 25, 2013 - link
The're fixed, sadly.Razorbak86 - Monday, March 25, 2013 - link
I have an MVF board with two rads and 3/8"x5/8" tubing throughout in a mid-tower case (Corsair Obsidian 650D). The 3/8" tubing was easy to route, looks stunning in blood red color, and performs exceptionally well in my system.Although it would have been nice to have G1/4" connections instead of barbs, once the tubing is installed, the barbs are barely noticeable, because they are hidden after installation of the tubing. Furthermore, there is very little real-world performance difference (from a thermal efficiency perspective) between 3/8" and 1/2" lines in a water cooling setup. Fractions of a degree, actually. Even with G1/4" connections, I would have still chosen 3/8" tubing throughout my system, simply for the ease of routing in my mid-tower case.
DanNeely - Tuesday, March 26, 2013 - link
Yeah. I bought in for 3/8" 5/8" tubing for ease of routing; but lots of people either decided bigger was better or that the last 0.1C was worth chasing and mixed size tubing looks ugly.noeldillabough - Tuesday, March 26, 2013 - link
I agree the smaller tubing is so very close but I got the larger tubing because it looks badass.EnzoFX - Monday, March 25, 2013 - link
I hate how we've devolved in the number of USB Ports. Moreso when there's wasted I/O space. Let alone when it's filled with legacy connections.DanNeely - Monday, March 25, 2013 - link
What exactly on this one are you blaming as a legacy connector? Unless you're complaining that most PC audio is still done via discrete analog hookups instead of via digital connections, or by turning our monitors into TVs I'm not sure what you're complaining about. If that is what you're complaining about, requiring everyone to either buy a tv receiver to break the audio out of their HDMI or to convince monitor makers (that won't spend an extra dollar for a DP input) to add 5.1 audio out to their monitors is delusional.Until Intel/Amd either put a lot more USB3 into their chipsets or add several extra PCIe lanes to the south bridge mixed USB2/3 is going to be here to stay because you can't get 10 or 12 USB3 ports in without giving something else up?
EnzoFX - Wednesday, March 27, 2013 - link
Did I say this particular board had legacy connections? No. My gripe is with few usb ports, a simple to grasp concept. You're average intel board has 6-8 usb ports, this was when Sandy Bridge came along I believe, and then we had DVI/VGA ports on there too, when there's already HDMI on board, or when an adapter could be used. With P55 we had 10USB ports on your most common average/budget board, and that's just on the back. This oh so premium board only has 8.Moricon - Wednesday, March 27, 2013 - link
The bard has 14 USB Ports 2/3, who needs 14 on the back, I want as many coming to the front as possible.